How to Consume TensorFlow in .NET
Find out how you can consume TensorFlow in .NET for your own apps in this in-depth walkthrough.
It’s no secret that we have been using TensorFlow for a while in order to design classification and detection networks so that we can improve our mobile scanning performance and accuracy.
Developed by the Google Brain Team, TensorFlow is a powerful open-source library for creating and working with neural networks. Many computer vision & machine learning engineers use TensorFlow via its Python interface among IDE’s like Pycharm or Jupyter in order to design and train various neural networks.
In this blogpost, we’ll talk about TensorFlow from the point of view of software engineers and developers. We want to share our experience and give you a short guide to help you building the libraries from source and using them in your own .NET application. Brace yourselves – it’s going to get techy!
Architecture
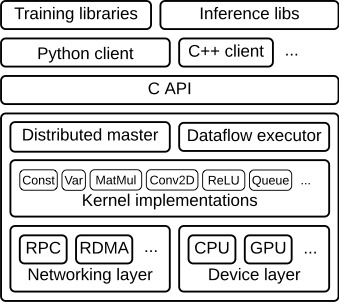
Let’s start with a look at the architectural design of TensorFlow components. In our case, we want to address the C++ layer in order to compile the inference libraries that are capable of consuming networks that we have already trained. By integrating these libraries into a so-called Windows Runtime Component, we are able to create a C++/CX layer that wraps around the TensorFlow C++ objects. This means we can consume TensorFlow in C# or any other .NET language.

Before we dig a bit deeper into the build system, we’ll familiarize ourselves with some of the terms of the TensorFlow environment.
Understanding the TensorFlow Environment
A Tensor represents the output of an Operation and doesn’t hold values, but the means of computing values within a Session. Tensors can be passed as input of another Operation, thus creating a data flow (a “TensorFlow?”) between operations, which we can call a Graph. So an Operation can be seen as a node in this Graph, taking 0 or more Tensors as input and producing 0 or more Tensors as output.
Each Operation is handled by a so-called Kernel, which schedules the execution on specific hardware (GPU or CPU, or even multiple threads) for different device types.
The environment in which Operations are executed and Tensor objects are evaluated, is called a Session. Sessions are responsible for loading and launching Graphs.
Kernel & Operation Registration
Each Operation in TensorFlow has to be registered with the REGISTER_OP() macro. This creates an interface for the operation, defining components such as the input/output types and attributes.
Kernels involve defining implementation(s) for the operations, whereas there can be different implementations for different device types (GPU / CPU) or data types. Kernels are registered with the REGISTER_KERNEL_BUILDER() macro. The reason that we mention these registration patterns explicitly is that it becomes an issue with the Microsoft linker when linking the TensorFlow libraries into your own component, and we’ll get back to that.
Read more about operation & kernel registration.
TensorFlow Build System for Windows
TensorFlow has been available for Linux-based operating systems, but there was no official Windows support until version 0.12. To this day, it’s still not so easy to build TensorFlow libraries from source for Windows, even though, thanks to the wide and active community, it’s not an impossible task anymore.
There is more than just one way to build the TensorFlow runtime and Python packages. The most common approach is using Google’s own Bazel build tool. For Windows, however, their engineers state: “We don’t officially support building TensorFlow on Windows; however, you may try to build TensorFlow on Windows if you don’t mind using the highly experimental Bazel on Windows or TensorFlow CMake build.”
At this point, it is not clear which one the better approach is, but we decided to go with CMake. CMake is a build tool to create Visual Studio projects via .cmake scripts. This way, you can edit the compiler and linker flags easily in Visual Studio before compiling them directly in Visual Studio, or simply run the MSBuild command in the command prompt.
Building TensorFlow for x86
Our biggest struggle was to get TensorFlow running on x86 machines because TensorFlow only supports 64-bit architectures. Of course, it makes sense to stick to 64 bit, especially when training networks.
The reason we adapted the build system to x86 is that our Anyline OCR SDK is available for x86 systems such as the HoloLens and depends on other 3rd party libraries which are built for x86 as well. Also, 32-bit processes can be run in a 64-bit environment, but not vice versa. Note that going with x86 only makes sense for inference (doing a forward-pass in already-trained networks) under these circumstances – we highly recommend sticking to the usual build and use GPU instead of CPU if possible!
We’ve prepared a guide, which is also based on this tutorial if you ever need to build TensorFlow with CMake for x86. The following guide will show you how to adapt, build, and consume TensorFlow in a Windows Runtime Component in order to expose its API in a C# application.
Prerequisites
These are the things you need before you start working:
- A good computer (recommended at least 16GB RAM)
- Windows 10 + Visual Studio 2015 or higher
- Git for Windows
- Swig (3.0.12)
- Cmake (3.6.2)
- Python 3.5
- CUDA 8.0 (if you’re using GPU)
- cudNN 5.1 (if you’re using GPU)
First, set the environment variables and check out TensorFlow 1.2 with Git by calling these commands in the prompt:

The CMake scripts will be located under tensorflow\contrib\cmake.
For x86 builds, you have to remove the -x64 parameters the tf_core_kernels.cmake and tf_core_framework.cmake scripts.
For us, the 3D pooling operations fail to compile with this error. Therefore, in the tf_core_kernels.cmake script we’ll remove the corresponding source/header files with this code:

It’s not the best solution but it works.
Now that you’ve modified the scripts, it’s time to configure CMake and let it create the Visual Studio projects with the following command in the \build folder:
- cmake .. -DCMAKE_BUILD_TYPE=Release -DSWIG_EXECUTABLE= -DPYTHON_EXECUTABLE= -DPYTHON_LIBRARIES= -Dtensorflow_ENABLE_GRPC_SUPPORT=OFF -Dtensorflow_BUILD_SHARED_LIB=ON -Dtensorflow_VERBOSE=ON -Dtensorflow_BUILD_CONTRIB_KERNELS=OFF -Dtensorflow_OPTIMIZE_FOR_NATIVE_ARCH=OFF -Dtensorflow_WIN_CPU_SIMD_OPTIONS=OFF
This will create the Visual Studio projects and tensorflow.sln solution. Note that the SHARED_LIB=ON will also create projects for the static libraries.
Protobuf Adaptations for x86
We have to modify the Protobuf library separately before compiling the other libraries. Therefore, open tensorflow.sln, build only the Protobuf project, open the Protobuf.sln in the /protobuf folder that has been generated.
Copy the x64 Release configuration to a new Win32 Release configuration, remove /MACHINE:x64 command lines from the settings, build all projects.
Verify with dumpbin.exe /HEADERS libprotobuf.lib that the compiled library is x86 architecture and not x64.
Eigen Adaptations for x86
There are a few modifications necessary for the Eigen library:
In Line 336 of \build\external\eigen_archive\Eigen\src\Core\util\Macros.h, set the define for EIGEN_DEFAULT_DENSE_INDEX_TYPE to be “long long” instead of std::ptrdiff_t – this is necessary to prevent narrowing conversion errors in some of the initializer lists in other parts of the code.
TensorFlow Adaptations for x86
In \tensorflow\tensorflow\core\common_runtime\bfc_allocator.h, you should replace the line
_BitScanReverse64(&index, n);
with the following:
#if __MACHINEX64
_BitScanReverse64(&index, n);
#else
_BitScanReverse(&index, n);
#endif
Build & Verify TensorFlow
Now that we’ve patched everything, it’s time to actually build the libraries and verify that it works. Therefore, we enter the following command in the \contrib\cmake\build folder in the prompt:

This will build all the necessary projects and finally run the tf_tutorials_example_trainer.exe program, which verifies things such as creating a session and training a simple graph. If everything worked, it should look like this:
Consuming TensorFlow
Now that we’ve got our compiled set of libraries, we want to consume them in a Windows Runtime Component project.
As stated in this article by Joe Antognini, copy the following preprocessor directives from the tf_tutorials_example_trainer project into your Runtime Component project:
- COMPILER_MSVC
- NOMINMAX
In order to locate all the necessary headers, add the following entries to the “Additional Include Directories” under your project settings under C/C++ -> General:
- D:\Downloads\tensorflow
- D:\Downloads\tensorflow\tensorflow\contrib\cmake\build
- D:\Downloads\tensorflow\tensorflow\contrib\cmake\build\tensorflow
- D:\Downloads\tensorflow\tensorflow\contrib\cmake\build\protobuf\src
- D:\Downloads\tensorflow\tensorflow\contrib\cmake\build\eigen\src\eigen
- D:\Downloads\tensorflow\tensorflow\contrib\cmake\build\protobuf\src\protobuf\src
Linking TensorFlow
The final step to include TensorFlow in your component is the linking part. We’ll link TensorFlow statically in our Runtime Component project.
Now it’s time to locate the generated .lib files for each project directory in the \Release folder and copy them to a place where your project will search for them by configuring “Additional Library Directories” in your project settings.
Also, add the following additional dependencies in your project settings under Linker -> Input:
- tf_core_framework.lib
- libprotobuf.lib
- tensorflow_static.lib
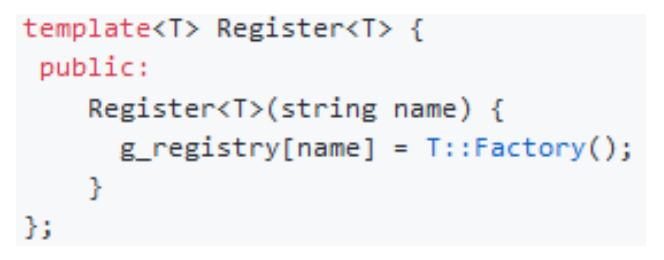
We’ve mentioned the Operation & Kernel registration patterns earlier, and now it’s time to bring it up again.
In pseudo-code, these patterns look like this:

And this code shows how it would be used:

The problem with the Microsoft build system is that the linker will strip out global constructors that TensorFlow uses to register session factories and kernels because it doesn’t see a need to include the symbols in the link step. This GitHub comment explains what’s going on. If you’d hit the build button at this point, it would compile fine, but at runtime, errors like “No OpKernel was registered to support Op ‘‘ with these attrs.” or “Op type not registered ‘‘” would occur.
There are linker flags, however, that will tell the linker to stop stripping these symbols. For Windows, the flag is called /WHOLEARCHIVE to include every symbol, and /WHOLEARCHIVE: to include all symbols of a specific library.
Unfortunately, simply using /WHOLEARCHIVE will cause “internal compiler errors” on Windows. That’s why we have to specify the libraries that we’ll need. Under Linker -> Command Line -> Additional Options, let’s include the following libraries:

Creating a TensorFlow Wrapper
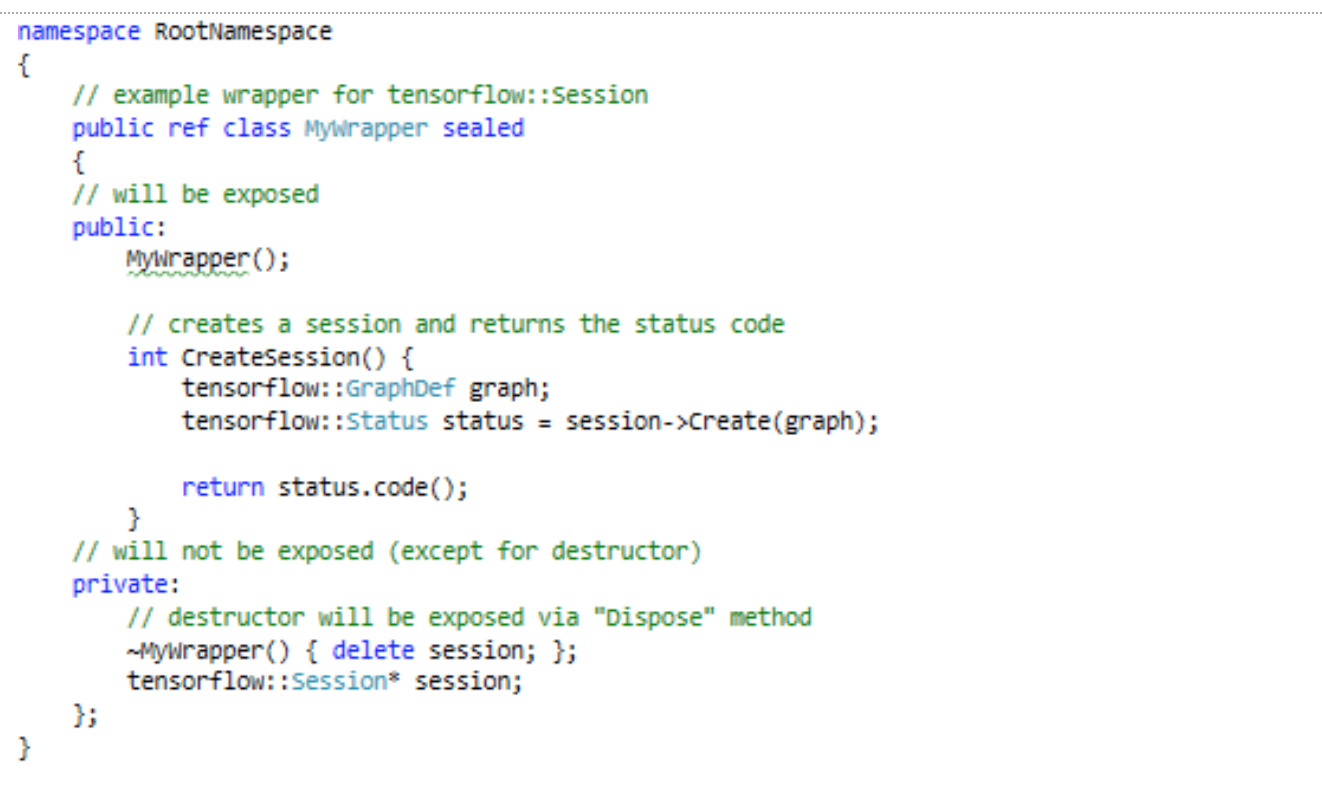
Now it’s time to create a wrapper layer around the TensorFlow API. As we created a Windows Runtime Component, the layer will be written in C++/CX. There are a few rules/guidelines to follow when exposing native C++ code to other .NET languages:
- Classes must be of type public ref and be sealed, meaning that they do not allow inheritance, e.g.: public ref class MyWrapper sealed
- Everything must be in the root namespace of the project
- Everything with a public modifier will be exposed through the generated .winmd file and can be referenced/consumed in other .NET projects
- Standard C++ types cannot be exposed this way, only C++/CX types can be exposed via so-called Object Handles
- This means that standard C++ types have to be hidden by using the internal or private modifier
This example illustrates how such a wrapper layer could look like:

In a C# project/application, for example, you can now reference the .winmd file of your Runtime Component and include the RootNamespace in your C# code.
Then, create the wrapped object and call the method like so:

This example isn’t 100% accurate, as we haven’t initialized/loaded the graph that we’re using the session with for example, but you get the idea.
Thank you for reading this rather technical blog post, we hope that this will help you on your mission to use TensorFlow in any UWP application. For more information on how we have used it, check out our other blog post about our success with TensorFlow on Windows.
Please feel free to follow the link below, if you’re interested in experiencing our own technology and mobile scanning solutions first hand.


