How to Integrate the Anyline SDK for Mobile Scanning in Android
Hello and welcome to our first tutorial here at Anyline! We will show you how you can easily integrate Anyline’s mobile scanning SDK into your app for Android and how to generate the community license key! If you want to skip the reading and just watch the video, please jump to the bottom of the page!

First Steps
The first step on the road of implementing our mobile scanning technology in your app is to create a new Android project in Android studio. The minimum SDK version supported by Anyline is API 15 which is IceCreamSandwich.
We are going to create an empty Activity. We actually don’t need it for this tutorial, but it is going to help us later on when we implement a use case. We will call it MainActivity – that’s fine for the moment.
Generally, there are two ways to integrate the Anyline SDK into your app. One way is to go to our website and download the SDK bundle which includes the examples app, the source code of the examples app, and the SDK for offline integration.
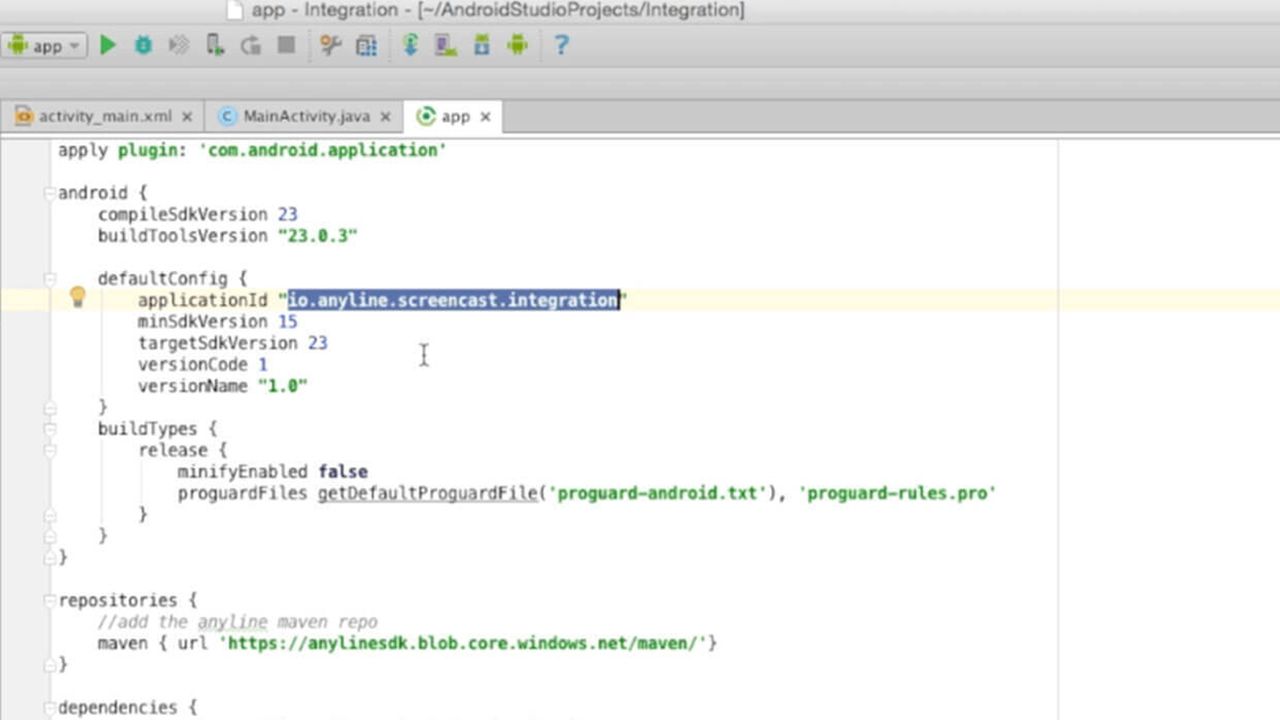
The other way is to download and include the SDK with Maven. To do that, we are going to add it as a dependency to the build.gradle in the app-module. In order to do that we have to open the build.gradle and copy the maven part from our documentation and paste it to the gradle file.
It’s easy to forget the syntax for this step, so we are going to take a shortcut and copy this part from the Anyline documentation website.
In the Android Quick Start Guide, you can see the maven repository. Just copy that and paste it into our gradle file. Now, to add the AnylineSDK as a dependency, we copy the compile dependency as well.
If we hit sync now, gradle is going to fetch the SDK from the maven storage and is going to set up the Anyline SDK for us to use. Next, we need to verify that by opening our MainActivity. You can see that the auto-complete feature already suggests the Anyline classes for us.
So everything is set up for us already, and we can start to develop our mobile scanning use case. In order to run our app with the Anyline SDK included, we require an SDK license key.
Getting the Licence Key
We will now generate a Community License on the Anyline website. You have to register here and request the SDK key. The best part about this is that the Community License is free for non-commercial usage.
You will get an email where you can see the further steps and the link in the email will bring you right to the Anyline customer portal. Just pick a password and register.
You will then receive an e-mail with further instructions to go to the Anyline Portal. There you click on manage licenses and we will generate the community license in order to get started.
This is the part where we need to go back to our app because a license is always bound to an application ID or bundle identifier. This was created before when we created the new app.
When we go back to the build.gradle file of the app-module you can see the application ID. Select it here, copy it, go back to the portal, and paste it there.
The Finish Line
That’s all you need to generate the license. If you hit generate now you receive the license key. Copy the license key and go back to the Android studio. Open the strings.xml and create a new string and paste the key here.
Then you’ve got it as a resource in your project. When you now go back to the MainActivity, you can just grab the license key with getString(R,string.anyline_licence). Now you have your own license and the SDK is integrated – you are all set to start your own mobile scanning use case!


