Low-End Android Devices and the “Exposure Triangle”
In this blog, we will take a look at the theory of photography and its connection to the cameras available on low-end Android devices. In particular, we will check out a theoretical construct called the “Exposure Triangle”, and how we can improve the overall quality of the input-stream of frames from the mobile device’s camera and consequently also the user experience.
Low-End Android Devices: Why Even Support Them?
Whether you are an Android enthusiast, freelancer, or a developer at a company, the reason to support low-end Android devices should be obvious – to support as many mobile devices as possible!
In this respect, the development on iOS is much simpler. You only need to support a couple of devices from the same producer with less variety in hardware, including strong CPU performance and camera functions.
On Android, however, this is a much harder task. Even though the operating system is laid out to support development on mobile devices from multiple producers and different CPU architectures, you have to keep in mind that you will be developing and deploying your app on hundreds of different types of mobile devices with varying hardware parameters.
Many Android devices are still running “Ice Cream Sandwich” or “Jelly Bean” Android versions. Ice Cream Sandwich, which is API level 15 and Android version 4.0.x, was first released in October of 2011. This means that there are mobile devices being used that are almost a decade old, or even older!
This means that if you want to develop an app that uses the camera or does real-time image processing on the input images, you will need to be aware that a significant amount of devices are still in use with poor cameras and not much processing power.
Of course, bad camera performance is not only measured on the hardware side of things (low resolution, slow/not precise autofocus,…) but also on the software side (not fully standardized camera parameter settings, exposure locking problems, bad FPS priority modes…).
However, there are ways to work with these low-end Android devices effectively. To do so, let’s take a look at the “Exposure Triangle” and see what factors contribute to the exposure of a camera sensor, what camera properties each of these factors influences, and how we can tune the settings to get the optimal frame rate for real-time image processing applications even on these low-end Android devices.
The Exposure Triangle
One of the most important factors in photography that needs to be considered when taking a picture, besides artistic choices, is to set the camera options in such a way that the scene looks well lit.
There is a direct connection between the amount of light available in the scene and how well-lit a scene with the same camera settings appears to be in the picture. Obviously, at night there is very little light available, and during the day enough light is available.
Exposure is defined as the amount of light per unit area that reaches the camera sensor. A picture in which the sensor was not exposed to enough light is said to be “under-exposed” and appears to be rather dark and analogously, an “over-exposed” picture appears very bright.
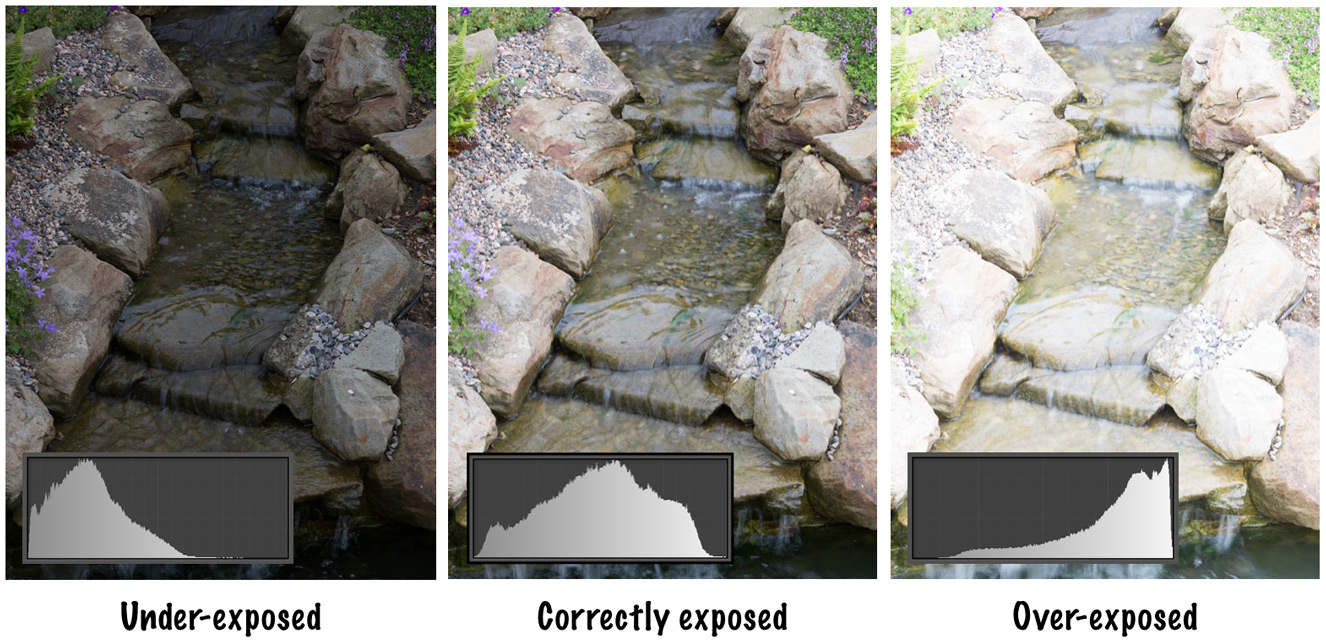
There are generally three different factors with which we can control how exposed the camera sensor to the incoming light from the scene is. With each of these factors, however, come different properties that influence the look and feel of a picture. The first one is the aperture. The aperture is defined in optics as a hole or opening through which light travels.
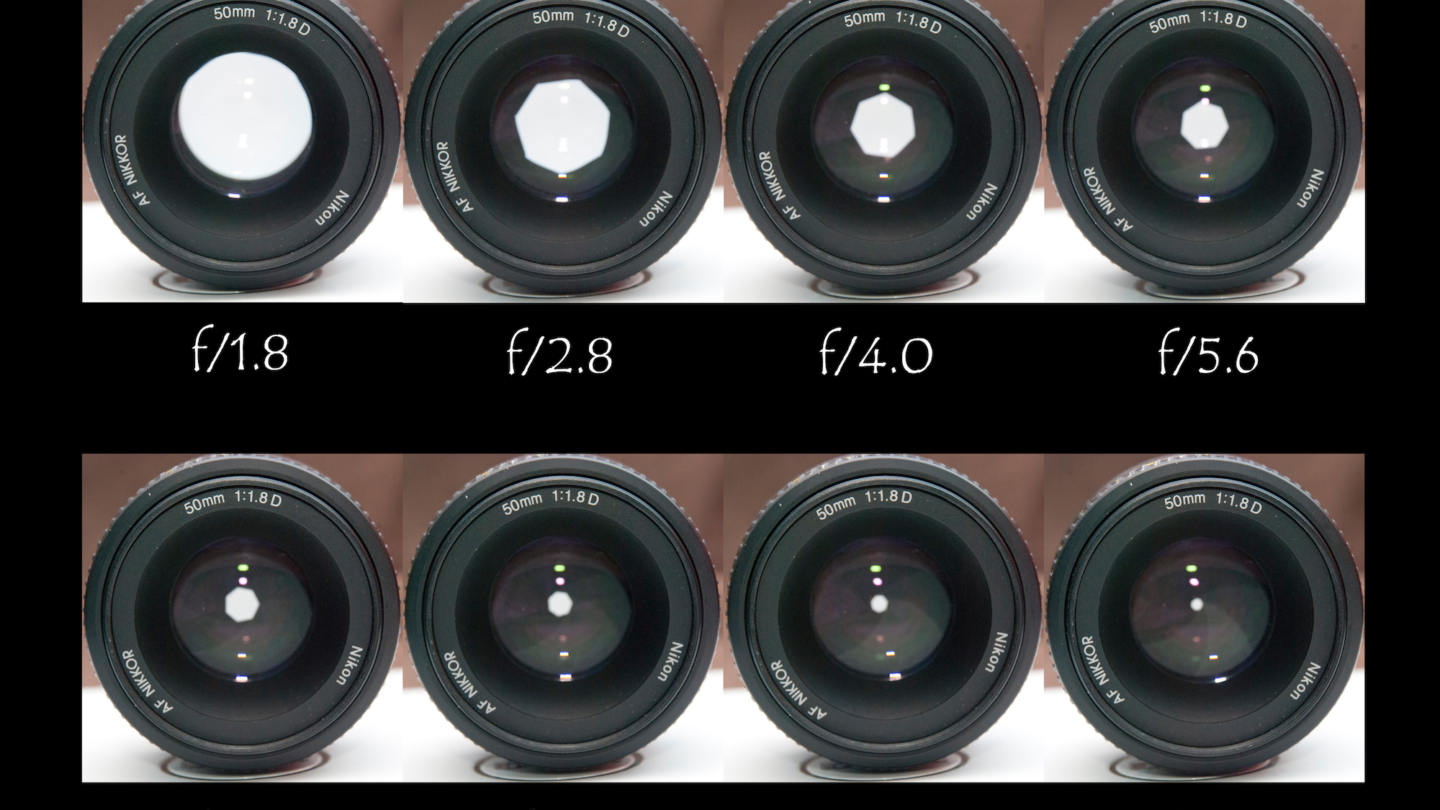
What we actually change when we select a specific aperture setting on a DSLR camera, is the size of the opening. The opening size is quantized with the f-number and, without going further into details, the rule is that the higher the denominator, the smaller the size of the opening.
One direct consequence of the opening size is that with a smaller hole less light comes in, and with a larger opening more light comes in. The indirect consequence is, that we also influence the angle from which the light can come in and reach the sensor.
An object in the scene appears to be in focus when all the light rays reflected from a single point on the surface of the object travel through the lens, get refracted, and meet at a single point on the sensor. Moving the object a little closer or further from the camera causes the light rays to project onto a whole circle on the sensor.
This way, the single point in the scene appears to be blurry in the picture. A great illustration of this principle can be seen in the picture below.
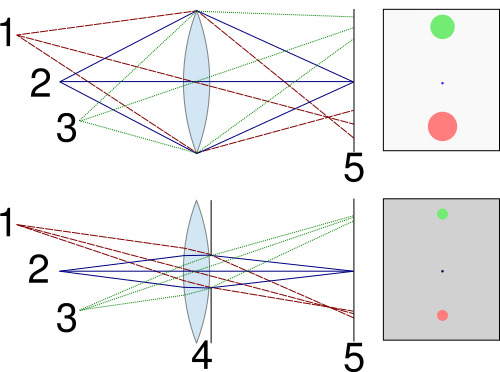
This picture also greatly displays the connection between the aperture size, the angle of incoming rays, and the size of the projected points in the scene onto the camera sensor. We may choose to have a small aperture, a sharper image with respect to depth, but less incoming light.
On the other hand, we may choose to have a large aperture, a blurrier image with respect to depth, and much more incoming light. And have you noticed how I mentioned sharpness with respect to depth? This is also called the depth-of-field, and all of you will know exactly what is meant by this when looking at the next two images.
The left image shows a very narrow depth of field, taken with a large aperture of f/5.6. The right image shows a wide depth of field, taken with a small aperture of f/32.

The second important factor that influences the exposure of an image is the shutter speed. When you take a picture, the camera sensor is exposed to the incoming light only for a certain time. There is a mechanical shutter in front of the sensor that travels horizontally or vertically at a constant speed and has a variably sized opening.
From this it is quite obvious, that the term “shutter speed” is a little bit misleading – the speed does not change, only the opening size. Once again, the smaller the opening, the less light can fall through the moving hole onto the sensor, and the larger the opening, the more light can fall onto the sensor.
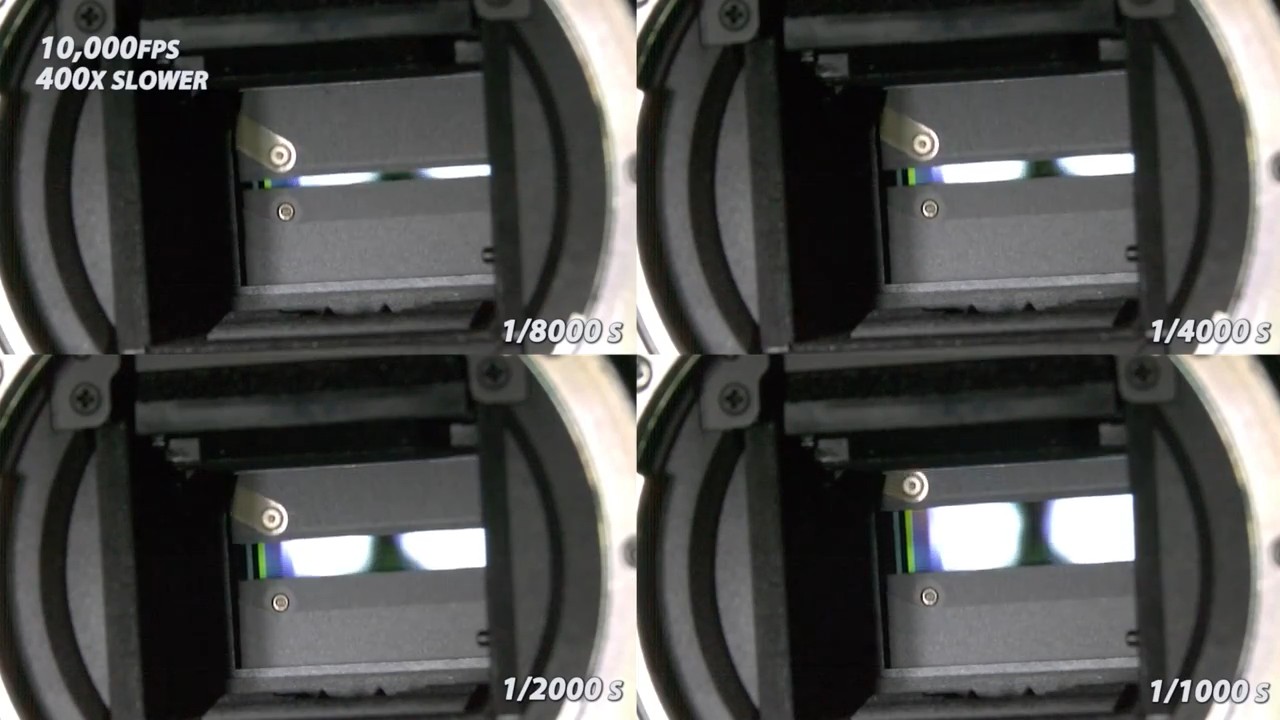
The same as with the aperture and the associated depth-of-field, the shutter speed has the property to influence the motion blur in an image. While the shutter moves from one side to the other, each row (or column) on the sensor is exposed a certain time to the incoming light. During this time, the sensor accumulates the incoming information and then at the end, it is read out row-by-row (or column-by-column).
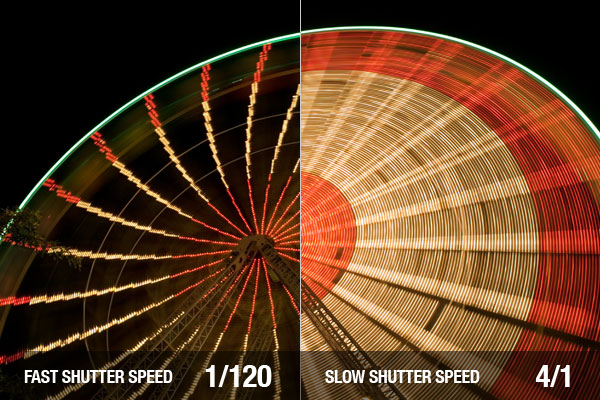
This means, that when we have a moving object in the scene, and we have a slow shutter speed, then this movement of the object is accumulated on the sensor as motion blur.
This way we can once again decide – fast shutter speed, little motion blur, and a small amount of incoming light, or slow shutter speed, a lot of motion blur, and a lot of incoming light. An example showing the effects of a slow and fast shutter speed can be seen in the picture below.
Also, to give you an idea of how the whole mechanical process of taking a picture with a DSLR camera works, let’s look at the following great slow-motion video. Notice how first the mirror, that reflects all of the incoming light to the user’s eye moves away, then the aperture closes to the defined opening size, and finally, the shutter moves from top to bottom. All this happens at the moment you hear that fast clicking noise after you press the button to take a picture.
The last of the three main factors influencing the exposure of the camera sensor is the ISO or the sensitivity of the sensor. Remember when you had to put the film rolls into the old cameras?
This is exactly where the ISO originates. The disadvantage back then was that once you put in a film into the camera, you would have to finish the roll, or pull it out in complete darkness and store it.
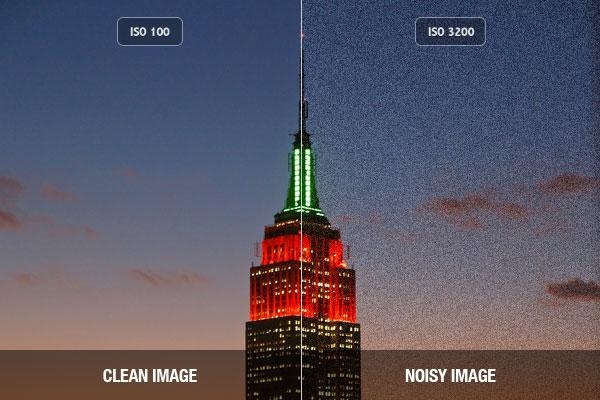
Nowadays, the sensitivity of a camera sensor can be changed adaptively. It is just sufficient to amplify the signal that is captured by the camera sensor. There is however the disadvantage, that with a shortly accumulated and highly amplified signal, there is also a lot of noise.
A visible grayscale or chromatic noise is the associated property with the ISO settings of the camera. The lower the ISO number, the lower the sensitivity of the sensor, and the higher the ISO number, the higher the sensitivity.
By now, you must have realized that there is a strong connection between all of these three camera settings, namely the shutter speed, the aperture, and the ISO. And to visually represent this relationship we can draw a triangle, where all these factors build up the sides of this triangle. Also, the larger the area of the triangle, the higher exposure of the sensor there is.
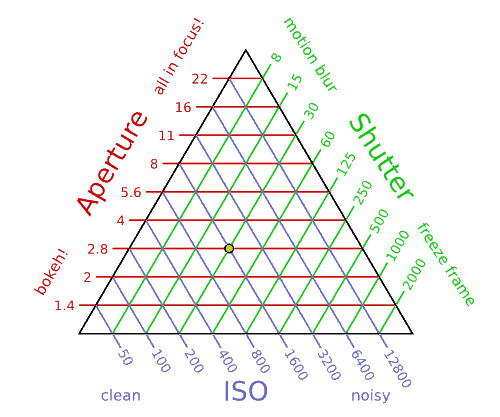
Every single point within this triangle constitutes a specific triplet of camera settings, with the single constraint that the exposure of the camera sensor remains the same. The great thing about this triangle is that we can fixate one of these settings, and then change the remaining two at will.
To give an example, we may want to fixate the aperture at f/2.8, because we want a nice shallow depth-of-field effect. This means, that now we can change the ISO and shutter speed settings.
If we would like to have a very fast shutter speed to capture a fast movement and at the same time have a fixed aperture, then we would move along the red line (f/2.8) to the right side of the triangle. This would mean that we would need to also increase the sensitivity of the sensor because we need to somehow compensate for the missing light that was decreased by choosing a fast shutter speed.
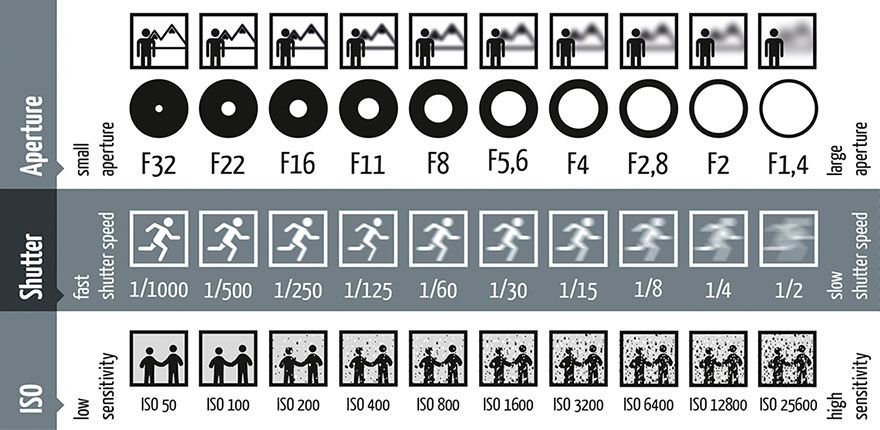
This would however also mean, that we can expect, that there will be a lot of visual noise in the image. Finally, to summarize it all, the following table provides a great overview:
Camera Settings – Priority Modes
Generally, all DSLR cameras have specific priority modes that can be set. There is a priority mode for each of the three mentioned factors of the exposure triangle. But what do they actually do?
They let the user set a specific value for one of the camera settings, and automatically adjust the other two, to get a good exposure. This means, that when we select the Shutter Priority Mode (S mode or Tv mode), then the user can set a specific shutter speed value, and then the camera automatically adjusts the ISO and the aperture.
Analogously, there are also the ISO- or Sensitivity Priority Mode (Sv mode), and the Aperture Priority Mode (A-mode or Av mode).
Low-end Android devices and the Exposure Triangle
Now that we know the concept of the exposure triangle, how does it all translate to mobile devices? Well, it’s actually really simple – mobile devices have a fixed aperture of around f/2.8 and also, when in automatic scene mode, a sensitivity priority mode.
This means that like in the example before, the automatic scene mode in low-end Android devices will be moving along the red line of f/2.8 aperture, and also try to keep the ISO as low as possible. The advantage of this is, that there will be little visual noise in the images.
On the other hand, the disadvantage is that the (simulated) shutter speed will increase. This will have no direct effect when a single image is being taken, however, when a sequence of images is being shown or processed, the frames per second (FPS) go down drastically. You will get a low FPS input stream of frames, that are well-lit, have little noise, and have a lot of motion blur.
As you can imagine, this kind of input frame stream is rather unwanted. The general rule is, that it is much easier to set the correct settings and let the hardware handle it than to exhaustively do per-image post-processing.
In most real-time image processing applications, it is not necessary to process an image in full resolution. Usually, you just downscale the image with an implicit blurring. This way, if the image contains any noise, it will be automatically processed and decreased through the blurring.
As a consequence, it is much better to choose a setting, where the frame rate is higher (faster shutter speed), with some noise. This way the temporal coherence between individual frames is also much better.
However, this behavior only takes effect when there is not enough light, so that the mobile device has to lower some properties to get the same exposure. In both videos, when the camera is pointed towards the screen and where there is enough light, both of them have the same great visual properties. Only when pointing towards the keyboard, where some light is missing, the camera switches the settings.
Android Camera Settings
As previously mentioned, there is an automatic scene mode setting and specific scene mode settings in Android. Both of these modes are rather restricted. In automatic scene mode, one can change the ISO settings at will, but the change of shutter speed settings is either not supported at all, or very poorly.
You can just set your preferred preview-frame rate and that’s it. If the mobile device will follow this preference is dependent on the device, but you can expect that it will not follow it most of the time.
On the other hand, in specific scene modes (e.g. sports scene mode, night scene mode, etc.), the settings are fixed to a specific value – and cannot be changed.
All of them have a specific application and “should” be used in that way. For most of them, you can guess the settings, for example, “sports scene mode” should be used for sports. Obviously, it is important that the frame rate is as high as possible so that you can take a picture of a moving object with as little motion blur as possible.
On the other hand, the ISO settings will be set high to compensate for the missing light. One important notice – it is NOT possible to reconstruct these specific scene modes by manually setting the camera parameters in the automatic scene mode!
This is exactly how we can counteract the decrease in FPS even in less well-lit scenes. In Android it is sufficient to set the sports scene mode on low-end Android devices:

We hope you enjoyed this brief introduction to the theory of photography and the application of the principles of the Exposure Triangle on low-end Android devices!


